
Beat the rush: spring hvac prep
I've noticed service calls spike every June as soon as the first heat wave hits. You can avoid the panic by checking your AC now while it's still cool out. Last year, local repair wait times hit two weeks by mid-July, and I don't expect 2026 to be any different.
Waiting until your AC breaks down in the middle of July means you’re at the mercy of a busy repair schedule and potentially higher costs. Technicians are in high demand during peak season, and emergency repairs often come with premium pricing. A proactive approach to HVAC maintenance not only ensures your comfort but also protects your wallet.
Beyond cost, a functioning AC is becoming increasingly important for health and safety. Extreme heat can be dangerous, especially for vulnerable populations. A reliable system isn’t just about comfort; it’s about peace of mind. Don’t gamble with summer comfort – a little spring prep goes a long way.
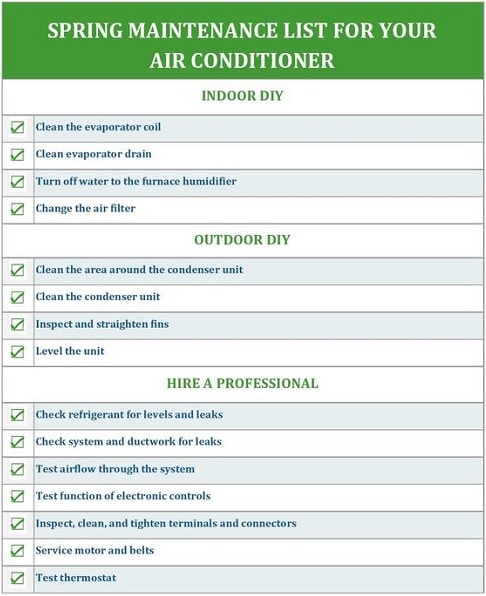
Cleaning your indoor and outdoor coils
Dirty condenser and evaporator coils are a major cause of AC inefficiency and potential breakdowns. The coils are responsible for heat transfer, and when they’re covered in dust, dirt, or debris, the system has to work harder to achieve the desired temperature. This increased strain can lead to compressor failure, a very expensive repair.
The outdoor condenser coil, located in the exterior unit, needs regular cleaning. Start by turning off the power to the unit at the breaker box – safety first! Remove any surrounding debris like leaves or branches. Use a fin comb to straighten any bent fins, then gently spray the coil with a garden hose, working from the inside out. Avoid using high pressure, which can damage the fins.
The indoor evaporator coil, located within the air handler, also requires attention. Accessing this coil usually requires removing an access panel (again, power off!). Use a specialized coil cleaner – follow the manufacturer’s instructions carefully – and a soft brush to remove dirt and grime. The NREL recommends regular coil cleaning as part of routine maintenance to optimize performance (NREL, Measure Guideline: Air Conditioner Diagnostics, Maintenance, and Replacement, March 2013).
There are various coil cleaner options available, from foaming sprays to no-rinse formulas. Always wear gloves and eye protection when handling coil cleaners. Be sure to read the label and choose a cleaner compatible with your coil material. Don’t skip this step – clean coils mean a more efficient and reliable AC.
Filter changes and MERV ratings
Air filters catch the dust and pollen that would otherwise gunk up your system. When they get clogged, the motor has to strain to pull air through, which spikes your electric bill. You need to pick the right MERV rating for your specific unit rather than just grabbing the cheapest one at the hardware store.
Filters come in several varieties: fiberglass, pleated, and HEPA. Fiberglass filters are the least expensive but offer minimal filtration. Pleated filters provide better filtration and are a good balance between cost and performance. HEPA filters offer the highest level of filtration, capturing even microscopic particles, but they can significantly restrict airflow if your system isn’t designed for them.
MERV (Minimum Efficiency Reporting Value) ratings indicate a filter’s ability to capture particles. Higher MERV ratings mean better filtration, but also increased airflow resistance. A MERV rating of 8-11 is generally recommended for residential use. Change your filter every 1-3 months, depending on the filter type, household size, and whether you have pets. People with allergies or respiratory issues may benefit from more frequent changes.
There's a lot of misinformation about filters. One common myth is that a higher MERV rating is always better. While it improves air quality, it can strain your system. Another is that you can wash and reuse disposable filters – this isn’t recommended, as it damages the filter material. Smart filters that monitor air quality and alert you when it's time for a change are also becoming increasingly popular.
- Fiberglass filters are cheap but only stop large debris.
- Pleated: Good balance of cost and performance.
- HEPA: Highest filtration, potential airflow restriction.
Drain Line Inspection & Clearing
The condensate drain line removes moisture that accumulates during the cooling process. A clogged drain line can cause water to back up, leading to leaks, water damage, and even system shutdown. This is a very common issue, especially in humid climates.
Signs of a clogged drain line include water leaking from the indoor unit, or the system shutting off unexpectedly. To clear a clog, start by locating the drain line – it’s usually a PVC pipe near the indoor unit. You can try flushing it with a mixture of vinegar and water (equal parts). Let it sit for about 30 minutes, then flush with water.
If vinegar doesn’t work, you can use a wet/dry vacuum to suck out the clog. Alternatively, a drain snake can be used to physically break up the blockage. Preventing algae growth is key to avoiding future clogs. Pouring a cup of vinegar down the drain line monthly can help inhibit algae growth.
The Department of Energy recommends regular inspection and cleaning of the condensate drain line as part of annual maintenance (energy.gov, Air Conditioner Maintenance). Addressing this issue proactively can prevent significant water damage and costly repairs. Don’t ignore a dripping AC – it’s a sign of a potential problem.
Fan & Blower Motor Checkup
The fan and blower motor are essential components of your HVAC system, responsible for circulating air throughout your home. A malfunctioning fan or blower motor can significantly reduce cooling efficiency and even cause the system to overheat.
Visually inspect the fan blades for any damage, debris, or obstructions. Make sure the blades are clean and securely attached. Listen for any unusual noises, such as squealing or grinding, which could indicate a failing motor. Checking the motor’s amperage draw requires specialized equipment and knowledge.
Signs of a failing motor include unusual noises, overheating, or a noticeable decrease in airflow. If you suspect a problem with the fan or blower motor, it’s best to call a professional HVAC technician. Working with electrical components can be dangerous, and motor repairs often require specialized tools and expertise.
Ignoring a failing motor can lead to further damage and potentially a complete system shutdown. Regular inspection and prompt repairs are crucial for maintaining optimal performance and preventing costly breakdowns.
Electrical Connections & Refrigerant Levels
Working with electrical components and refrigerant is extremely dangerous and should only be performed by qualified professionals. Loose electrical connections can cause overheating and potentially a fire hazard. Refrigerant leaks can harm the environment and reduce cooling efficiency.
A professional technician will carefully inspect all electrical connections, tightening any that are loose and ensuring proper grounding. They will also check refrigerant levels using specialized gauges and equipment. Low refrigerant levels indicate a leak, which must be located and repaired.
Refrigerant leaks not only reduce cooling performance but also contribute to environmental damage. Refrigerants are potent greenhouse gases, and releasing them into the atmosphere is illegal. Handling refrigerant requires EPA certification, and only certified technicians are authorized to perform refrigerant-related services.
Don't attempt to check or add refrigerant yourself. It's a job for the professionals. Prioritize safety and environmental responsibility by leaving refrigerant handling to qualified HVAC technicians.
Professional Inspection: Is It Worth It?
While many HVAC maintenance tasks can be performed by homeowners, a professional tune-up offers benefits that DIY efforts can’t match. A qualified technician has the expertise, tools, and training to thoroughly inspect your system and identify potential problems before they become major issues.
A professional inspection typically includes cleaning coils, checking refrigerant levels, inspecting electrical connections, lubricating moving parts, and testing system performance. The cost of a tune-up typically ranges from $79 to $200, depending on the system type and location. This is a small investment compared to the cost of potential repairs or a complete system replacement.
Here are some questions to ask an HVAC technician:
• What does a tune-up include?
• What is your experience with my system type?
• Do you offer a warranty on your work?
- Q: What does a tune-up include?
- Q: What is your experience with my system type?
- Q: Do you offer a warranty on your work?
Popular Smart Thermostat Comparison (Spring 2026)
| Thermostat Model | Key Features | Compatibility | Ease of Use | Approximate Price Range |
|---|---|---|---|---|
| Nest Thermostat | Geofencing, Learning capabilities, Voice control (Google Assistant integration) | Widely compatible with most 24V HVAC systems. Check Nest website for specific compatibility. | Generally considered user-friendly with a clean interface and intuitive mobile app. | $130 - $250 |
| Ecobee Smart Thermostat Premium | Geofencing, Learning, Voice control (Amazon Alexa, Google Assistant, Apple HomeKit), Remote sensors for improved comfort | Compatible with most 24V HVAC systems, including those with C-wire or Power Extender Kit (PEK). | Offers advanced features and customization options, potentially requiring a steeper learning curve for some users. | $200 - $350 |
| Honeywell Home T9 Smart Thermostat | Geofencing, Learning, Voice control (Amazon Alexa, Google Assistant), Smart Room Sensors | Compatible with a broad range of HVAC systems, including those with or without a C-wire. Compatibility checker available on Honeywell Home website. | User-friendly interface with a focus on simplicity and clear displays. | $150 - $300 |
| Emerson Sensi Touch 2 Smart Thermostat | Geofencing, Learning, Voice control (Amazon Alexa, Google Assistant) | Compatible with most 24V HVAC systems. C-wire required for some features. | Simple setup and operation, making it a good choice for first-time smart thermostat users. | $100 - $200 |
| Mysa Smart Thermostat | Geofencing, Learning, Voice control (Amazon Alexa, Google Assistant, Apple HomeKit), Designed for electric baseboard heaters | Specifically designed for high-voltage electric baseboard heaters; not compatible with standard 24V HVAC systems. | Focuses on ease of use for electric heating control. | $150 - $250 |
Illustrative comparison based on the article research brief. Verify current pricing, limits, and product details in the official docs before relying on it.

No comments yet. Be the first to share your thoughts!