
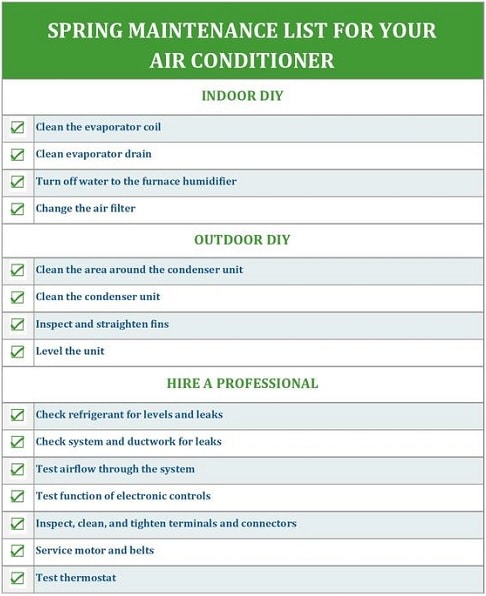
Get ahead of the summer rush
Spring is the ideal time to schedule maintenance for your air conditioning system. It’s easy to forget about HVAC when you’re not actively using it, but a little preparation now can save you a lot of trouble – and money – later. Waiting until the peak of summer means facing longer wait times for Air Conditioning Repair and potentially higher service costs.
The demand for HVAC technicians skyrockets when temperatures soar. Technicians are booked solid, and you might find yourself waiting days, or even weeks, for someone to address a breakdown. Proactive maintenance now minimizes the risk of a mid-summer failure, keeping you cool and comfortable when you need it most.
Beyond preventing breakdowns, a well-maintained system operates much more efficiently. Clean coils, fresh filters, and properly lubricated parts all contribute to lower energy bills. That efficiency translates directly into savings throughout the summer, offsetting the cost of the maintenance itself. Plus, regular check-ups can extend the overall lifespan of your HVAC equipment.
Cleaning your coils
Dirty coils are the main reason AC units struggle. The condenser releases heat outside while the evaporator absorbs it inside. If they're covered in grime, the heat has nowhere to go. This forces the motor to run longer and hotter. A 2013 NREL report by D. Springer found that basic maintenance like this is the only way to keep these systems reliable.
Cleaning the outdoor condenser coil is generally a DIY-friendly task. First, always turn off the power to the unit at the breaker box. Then, remove any debris like leaves or branches. Use a fin comb to straighten bent fins and a garden hose (with a gentle spray nozzle) to wash away dirt from the outside. Avoid using high pressure, which can damage the delicate fins.
Cleaning the indoor evaporator coil is more complex. It's located inside the air handler, and accessing it can be tricky. While some homeowners attempt this themselves, I strongly recommend professional cleaning. Improper handling can damage the coil, leading to expensive repairs. A professional has the tools and expertise to clean the coil safely and effectively.
Signs that your coils need cleaning include reduced airflow, longer cooling cycles, and higher energy bills. Regularly inspecting and cleaning your coils is one of the best ways to maintain optimal HVAC performance and prevent costly breakdowns.
- Cut the power at the breaker.
- Remove debris from around the outdoor unit.
- Straighten bent fins with a fin comb.
- Gently wash the outdoor coil with a garden hose.
Choosing the right air filter
Change your air filter. It is the simplest way to keep the unit alive. A clogged filter chokes the airflow, which makes the motor work twice as hard and eventually burn out. You'll also breathe cleaner air.
However, simply changing the filter isn’t enough. You need to choose the right filter. Filters are rated using a MERV (Minimum Efficiency Reporting Value) scale, ranging from 1 to 20. A higher MERV rating means the filter captures more particles, but it can also restrict airflow more. For most residential HVAC systems, a MERV rating of 8-11 is a good balance.
Consider your household when selecting a filter. If you have pets, allergies, or respiratory issues, a higher MERV rating (11-13) might be beneficial. However, check your HVAC manufacturer's recommendations, as some systems can’t handle the increased airflow restriction of a higher MERV filter. Generally, filters should be changed every 1-3 months, but this depends on the filter type, household size, and air quality.
- MERV 1-4: These catch big stuff like lint and dust bunnies.
- MERV 5-8: Good for general household use, capture mold spores and pet dander.
- MERV 9-12: Better for allergy sufferers, capture smaller particles like smoke.
- MERV 13-16: Hospital-grade filtration, capture bacteria and viruses.
MERV Ratings and Particle Filtration
| MERV Rating | Filters | Typical Particle Capture | Airflow Impact |
|---|---|---|---|
| 8 | Commonly found in residential systems | Dust, pollen, dust mites, larger mold spores | Minimal impact on airflow |
| 11 | Improved filtration for homes with mild allergies | Smaller pollen, pet dander, mold spores, some dust | Slightly reduced airflow |
| 13 | Popular choice for better indoor air quality | Fine dust, smoke, smog, pet dander, bacteria | Noticeable reduction in airflow, may require system check |
| 16 | Hospital-grade filtration, often used with specialized systems | Virus carriers, very fine smoke, bacteria, most allergens | Significant reduction in airflow; may not be compatible with all systems |
Illustrative comparison based on the article research brief. Verify current pricing, limits, and product details in the official docs before relying on it.
Clearing the drain line
Your air conditioner produces condensation as it cools the air. This water is collected in a drain pan and removed through a condensate drain line. Over time, this line can become clogged with algae, mold, and debris, leading to water leaks and potentially shutting down your system. The Department of Energy has resources available online detailing proper AC maintenance, including drain line care.
Signs of a clogged drain line include water leaking from around the indoor air handler, a musty odor, or the system shutting off unexpectedly. Regular maintenance can prevent these issues. You can try flushing the drain line with a mixture of equal parts white vinegar and water. Pour the solution into the drain line opening (usually a PVC pipe near the indoor unit).
You can also use a wet/dry vacuum to suck debris out of the line. Check the drain pan for mold while you're there. If you see any, scrub it with a diluted bleach solution so you aren't breathing in spores all summer.
- Locate the condensate drain line opening.
- Pour vinegar and water solution into the line.
- Alternatively, use a wet/dry vacuum to clear debris.
- Inspect and clean the drain pan for mold.
Checking electrical connections
Dealing with electrical components can be dangerous, so safety is paramount. As a homeowner, you can visually inspect electrical connections for loose wires or corrosion. Always turn off the power to the unit at the breaker box before inspecting anything. Never touch any wires or components if you’re not comfortable or qualified.
A properly sized circuit breaker is essential for protecting your HVAC system. If the breaker trips frequently, it could indicate a problem with the electrical system or the HVAC unit itself. This is a job for a qualified electrician. I strongly advise against attempting any electrical repairs yourself unless you have the proper training and experience.
Inspecting the fans
Inspect the fan blades on both the indoor air handler and the outdoor condenser unit. Look for any signs of damage, cracks, or imbalance. A damaged fan can significantly reduce airflow and put extra strain on the system. Even a slightly bent blade can disrupt airflow and lower efficiency.
If the fan blades are dirty, you can carefully clean them with a soft brush and soapy water. Some fan motors are sealed and don't require lubrication; others may need occasional oiling. Consult your owner’s manual to determine if your fan motor requires lubrication and what type of oil to use. Remember to turn off the power before performing any maintenance.
Calibrating your thermostat
If you have a smart thermostat, ensure it’s functioning correctly. Check the programmed schedule to ensure it aligns with your daily routines. Verify the sensor calibration to ensure accurate temperature readings. Also, confirm that the remote access is working properly so you can control your system from anywhere.
Smart thermostats offer several energy-saving features, such as geofencing (adjusting the temperature based on your location) and learning modes (automatically optimizing the schedule based on your usage patterns). Take advantage of these features to maximize efficiency and offset maintenance costs. A properly programmed smart thermostat can significantly reduce your energy bills.

No comments yet. Be the first to share your thoughts!