
Beat the rush with spring prep
Spring is the best time to check your HVAC. Most people wait until a heat wave hits to call for repairs, but that's when systems are most likely to fail under the sudden load. A quick tune-up now helps avoid emergency repair costs in July.
The demand for HVAC services skyrockets as summer approaches. Technicians get booked up quickly, and you might find yourself waiting days for help if something does go wrong. Getting a jump start on maintenance now means you’ll likely secure a quicker appointment and potentially avoid those peak-season price increases. It’s simply a smarter approach.
Don't underestimate the value of a well-maintained system. Regular upkeep isn’t just about preventing emergencies; it’s about ensuring your HVAC system operates at peak efficiency. That translates to lower monthly energy bills and a more comfortable home. Think of it as an investment, not an expense.
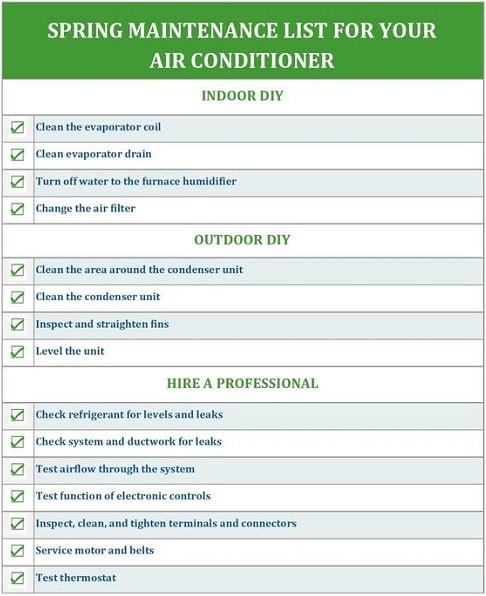
Change your air filters
Changing your air filter is arguably the easiest and most impactful thing you can do to maintain your HVAC system. A dirty filter restricts airflow, forcing your system to work harder, which reduces efficiency and can lead to overheating and premature wear. It also directly impacts your indoor air quality.
Air filters come in various types, each with different levels of filtration. Fiberglass filters are the most basic and least expensive, offering minimal protection. Pleated filters are more effective at capturing dust, pollen, and other allergens. HEPA filters provide the highest level of filtration, removing up to 99.97% of airborne particles – ideal for those with allergies or respiratory issues.
Filters are rated using the MERV (Minimum Efficiency Reporting Value) system. ENERGY STAR recommends a MERV rating of 8-13 for most residential systems. According to ENERGY STAR, filters should be changed every 1-3 months, though this can vary based on factors like pet ownership and air quality. Central AC, heat pumps, and furnaces all benefit from regularly changed filters, but some systems may require specific filter sizes or types – check your owner's manual.
A clogged filter lets dust and pollen circulate through your rooms. Keeping it clean is a basic way to keep the air breathable and the system running without straining the motor.
Clean the indoor and outdoor coils
Clean evaporator and condenser coils are essential for efficient heat transfer. The evaporator coil, located inside your air handler, absorbs heat from your home's air. The condenser coil, located outside in your outdoor unit, releases that heat. When these coils are covered in dirt, dust, or debris, they can’t function properly, forcing your system to work harder and consume more energy.
Dirty coils can lead to a variety of problems, including reduced cooling capacity, increased energy bills, and even system failure. Over time, a buildup of debris can restrict airflow and cause the compressor to overheat. Regular cleaning can prevent these issues and extend the life of your HVAC system.
Cleaning the coils yourself is possible, but requires caution. First, always turn off the power to the unit at the breaker box. For the evaporator coil, you’ll typically need to remove an access panel and gently brush away dirt with a soft brush. For the condenser coil, remove any debris from around the unit and then carefully clean the fins with a fin comb and a garden hose (use a low-pressure setting).
There are times when professional cleaning is necessary. If the coils are heavily soiled or if you’re uncomfortable performing the cleaning yourself, it’s best to call a qualified HVAC technician. They have the tools and expertise to clean the coils thoroughly and safely. You will likely need a fin comb, a soft brush, and potentially a coil cleaner solution.
Drain Line Check: Preventing Water Damage
Your HVAC system produces condensation as it cools air. This condensation is collected and drained away through a condensate drain line. If this line becomes clogged with algae, mold, or debris, it can cause water to back up, leading to water damage, mold growth, and potential system failure.
Inspect the drain line regularly for any signs of blockage. You can often identify a clog by noticing water pooling around the indoor unit. To flush the drain line, you can use a wet/dry vacuum or carefully pour a cup of distilled vinegar into the drain line opening.
Preventative measures can help keep the drain line clear. Using algaecide tablets specifically designed for HVAC systems can inhibit the growth of algae and mold. However, always follow the manufacturer's instructions carefully. If you suspect a severe clog or are uncomfortable working with the drain line, it’s best to call a professional.
Fan Functionality: Motors & Blades
Both the indoor blower fan and the outdoor condenser fan play a critical role in your HVAC system’s performance. The blower fan circulates air throughout your home, while the condenser fan helps dissipate heat from the refrigerant. Ensuring both fans are functioning properly is crucial for efficient operation.
Inspect the fan blades for any signs of damage, such as cracks or bends. Make sure the blades are clean and free of debris. Also, check that the fan is rotating freely without any unusual noises or vibrations. A wobbly or noisy fan could indicate a problem with the motor or bearings.
Many older fan motors require periodic lubrication. However, many newer motors are sealed and do not need to be lubricated. If your motor does require lubrication, consult your owner's manual for the recommended type of oil and lubrication schedule. Signs of a failing fan motor include excessive noise, slow rotation, or complete failure to start.
- Look for cracks or bends in the blades.
- Spin the fan by hand to check for resistance.
- Listen for unusual noises.
Hire a pro for refrigerant
Refrigerant is the lifeblood of your air conditioning system, responsible for absorbing and releasing heat. Low refrigerant levels can significantly reduce cooling capacity and cause your system to work harder, leading to increased energy bills and potential damage.
Checking and adding refrigerant is a job for a qualified HVAC technician. Refrigerant handling requires specialized equipment and training, and improper handling can be harmful to the environment and your health. Refrigerant leaks contribute to ozone depletion and climate change.
The cost of a refrigerant refill can vary depending on the type of refrigerant and the extent of the leak. Expect to pay anywhere from $150 to $500 or more. It’s important to address the source of the leak, not just top off the refrigerant, to prevent recurring issues.
Electrical Connections: Safety First
Electrical problems are a leading cause of HVAC system failures. Before inspecting any electrical components, always turn off the power to the unit at the breaker box. This is a non-negotiable safety precaution.
Visually inspect the wiring for any signs of damage, such as frayed insulation, loose connections, or corrosion. If you notice any of these issues, do not attempt to repair them yourself. Call a qualified electrician or HVAC technician. Tampering with electrical components can be dangerous and could void your warranty.
Regularly checking your electrical connections can help prevent fires and ensure the safe operation of your HVAC system. If you’re uncomfortable performing this inspection, it’s best to leave it to a professional.
System Testing & Thermostat Check
After completing all the maintenance tasks, it’s time to test your system to ensure it’s working properly. Turn the power back on and run both the cooling and heating functions for at least 15-20 minutes. Check the air temperature coming from the vents to verify that the system is producing cool or warm air as expected.
Take some time to review your thermostat settings and programming. Make sure it’s set to a comfortable temperature and that the schedule is optimized for energy efficiency. Consider using a programmable or smart thermostat to automatically adjust the temperature based on your needs and preferences.
Smart thermostats allow for remote adjustments and tracking, which helps cut down on waste. If the system still feels sluggish after these checks, it is time to call a local technician.

No comments yet. Be the first to share your thoughts!